Demo Recipe

Use this like normal post content. The recipe will automatically be included at the end of the post, or wherever you place the shortcode:

Print Recipe
Demo Recipe
This must be the best demo recipe I have ever seen. I could eat this every single day.
Votes: 0
Rating: 0
You:
Rate this recipe!
Course Main Dish
Cuisine Italian
Prep Time 10 minutes
Cook Time 20 minutes
Passive Time 1 hour
Servings
people
Ingredients
Fresh Pesto
Course Main Dish
Cuisine Italian
Prep Time 10 minutes
Cook Time 20 minutes
Passive Time 1 hour
Servings
people
Ingredients
Fresh Pesto
Votes: 0
Rating: 0
You:
Rate this recipe!
Instructions
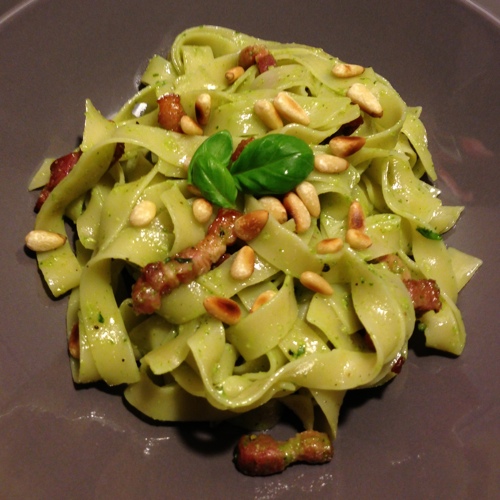
Fresh Pesto (you can make this in advance)
  1. We'll be using a food processor to make the pesto. Put the garlic, pine kernels and some salt in there and process briefly.
  2. Add the basil leaves (but keep some for the presentation) and blend to a green paste.
  3. While processing, gradually add the olive oil and finally add the Parmesan cheese.
Finishing the dish
  1. Bring a pot of salted water to the boil and cook your tagliatelle al dente.
  2. Use the cooking time of the pasta to sauté your bacon strips.
  3. After about 8 to 10 minutes, the pasta should be done. Drain it and put it back in the pot to mix it with the pesto.
  4. Present the dish with some fresh basil leaves on top.
Recipe Notes

Use this section for whatever you like.

Share this Recipe

This text will appear below your recipe.

Butterscotch Pudding Recipe

Butterscotch Pudding Recipe

Ingredients

  • 2 tablespoons unsalted butter
  • 1 1/2 cups dark brown sugar
  • 1/2 teaspoon kosher salt
  • 1 1/4 cup cream
  • 3/4 cup whole milk
  • 3 egg yolks
  • 1 1/2 tablespoons vanilla extract

Method

1 Preheat oven to 325°F and set a kettle of water to boil. Set four ramekins or oven-safe bowls out and a large baking dish. In a saucepan melt the butter. Once melted add the brown sugar and salt, stir until well combined. Add the cream and milk to the sugar mixture. Heat to a boil and remove from heat.

2 Slowly, in a thin stream, pour the heated sugar-dairy mixture into the egg yolks, whisking constantly so that the egg yolks are tempered by the warm mixture, but not cooked by it. Stir in the vanilla extract. Pour through a fine mesh sieve to catch any cooked bits of egg.

3 Ladle the mixture evenly into the ramekins. Place ramekins in the baking dish and pour the hot water into the baking dish until the water rises an inch from the top of the ramekins. Lightly tent the pan with some vented foil and bake for 50-65 minutes or until set (the sides should be firm and the center a bit wobbly). Be sure to rotate the pan half way through cooking. Allow to cool or, preferably, chill before serving.

Serves 4


Butterfly berm

Butterfly berm

The butterfly berm is an easy family project with colorful, nectar-rich natives such as New Jersey tea, prairie blazing star and butterfly weed. Add a shallow saucer or old birdbath filled with sand, gravel and water for a butterfly “watering hole.” Berms in general are good design elements for an urban or suburban yard. These independent beds can be created in a day or a weekend by adding a low mound of topsoil. It’s best if there is no vegetation growing in the area where the berm will be placed. This gives you an immediate clean slate, and the slight elevation really sets off plants.


Legend

  1. Buttonbush
  2. New Jersey tea
  3. Rose verbena
  4. Purple coneflower
  5. Aromatic aster
  6. Prairie blazing star
  7. Butterfly weed
  8. Lanceleaf coreopsis
  9. Downy phlox
  10. Shining blue star


Hashed purple circle is butterfly watering hole.

  1. Buttonbush (Cephalanthus occidentalis)


  1. New Jersey tea (Ceanothus americanus)
  2. Rose verbena (Glandularia Canadensis)


  1. Purple coneflower (Echinacea purpurea)


  1. Aromatic aster (Symphyotrichum oblongifolium)
  2. Prairie blazing star (Liatris pycnostachya


  1. Butterfly weed (Asclepias tuberosa)


  1. Lanceleaf coreopsis (Coreopsis lanceolate)


  1. Downy phlox (Phlox pilosa)


  1. Shining blue star (Amsonia illustris)


Native American Seed pricing

1:  Button Bush, 1 pkt. – $6

2: New Jersey Tea – Not available

3: Rose Verbena (Pink Evening Primrose), 1 pkt. – $3

4: Purple Coneflower, 1 pkt. – $3

5: Aromatic Aster – Not available

6: Prairie Blazing Star, 1 pkt. – $6

7: Butterfly Weed, 1 pkt. – $3

8: Lanceleaf Coreopsis, 1 pkt. – $3

9: Downy Phlox – Not available

10: Shining Blue Star – Not available


If 9’Lx4’D, every 2” deep would be another 6 ft3.  So you would need:

Mulch:  3 bags

Soil:       6 bags

Edging: ~$20 for 25’-40’

Lots of seeds!

Butterflied Turkey with Fennel, Sausage, and Ricotta Stuffing

Butterflied Turkey with Fennel, Sausage, and Ricotta Stuffing

The technique: When it comes to poultry, butterflying means removing the backbone and flattening the bird like a book. This is easy enough to do with a chicken, but we suggest asking your butcher to butterfly the turkey.
The payoff: A flattened turkey cooks more evenly and quickly than a regular bird. Tucking the stuffing under the skin ensures that the meat will be moist and delicious.
Roasted turkey: Prep 1 hour Total 3 hours 30 minutes (includes roasting time)
Grilled turkey: Prep 1 hour Total 3 hours 30 minutes (includes grilling time)

If roasting the turkey, serve it with the Fresh Fennel Pan Gravy . Grilling the bird? Try the Mixed-Mushroom and Tarragon Gravy.hide ›

Ingredients

Stuffing:

  • 3 tablespoons olive oil
  • 1 1/2 pounds sweet Italian sausages, casings removed, broken into pieces
  • 2 medium fresh fennel bulbs, trimmed, diced, plus 1/4 cup chopped fronds
  • 2 cups chopped leeks (white and pale green parts only)
  • 1/2 cup chopped shallots
  • 5 garlic cloves, thinly sliced
  • 1/2 cup dry white wine
  • 2 cups fresh breadcrumbs made from crustless country-style French bread
  • 1 cup freshly grated Parmesan cheese
  • 1 cup whole-milk ricotta cheese
  • 2 large eggs
  • 2 teaspoons chopped fresh sage
  • 2 teaspoons chopped fresh rosemary
  • 1 teaspoon salt
  • 3/4 teaspoon ground black pepper

Turkey:


  • Special equipment: Charcoal chimney (if grilling) 13x9x2-inch disposable aluminum baking pan (to catch drips; if grilling)

Preparation

For stuffing:
Heat oil in large skillet over medium-high heat. Add sausage. Sauté until cooked through, about 6 minutes. Using slotted spoon, transfer to bowl. Add diced fennel, leeks, and shallots to skillet. Sauté 8 minutes. Add garlic and wine. Boil 3 minutes, scraping up browned bits. Scrape into bowl with sausage. Cool. DO AHEAD: Can be made 1 day ahead. Cover; chill.

Mix breadcrumbs, Parmesan, and ricotta into stuffing. Whisk eggs, sage, rosemary, 1 teaspoon salt, pepper, and fennel fronds in bowl. Stir into stuffing.

For turkey:
Mix fennel seeds, rosemary, salt, and pepper, then oil in small bowl. Rinse turkey; pat dry. Place turkey, skin side down, on work surface. Spread half of fennel oil over flesh side. Turn turkey over onto large rimmed baking sheet. Tuck wing tips under.

Starting at neck end, run fingers gently under skin of breast, thigh, and legs. Spread stuffing under skin. Massage to even out thickness of stuffing. Spread fennel oil over turkey skin.

To roast turkey:
Set rack at lowest position in oven and preheat to 350°F. Pour 1 cup stock or broth onto baking sheet under turkey.

Roast turkey until thermometer inserted into thickest part of thigh registers 160°F to 165°F, adding stock by cupfuls if pan is dry, 2 to 2 1/2 hours. Transfer turkey to platter; let rest 30 to 45 minutes. Reserve baking sheet with juices. While turkey rests, prepare Fennel Pan Gravy . Serve turkey with gravy.

To grill turkey:
Prepare barbecue (medium heat). Remove top grill rack. If using charcoal, light briquettes in chimney. When covered with white ash, push to opposite sides of bottom rack. Place disposable aluminum pan in center of rack (you will need to light additional briquettes, checking every 30 minutes during grilling time). Replace top rack. If using 3-burner gas grill, light burners on left and right sides, leaving center burner off. If using 2-burner gas grill, light burner on 1 side; place disposable pan over unlit side.

Place turkey, skin side up, on rack over pan; cover. Insert instant-read thermometer into hole in hood. Maintain temperature at 350°F on charcoal grill by opening and closing vents or adjusting temperature on gas grill with controls. Grill until thermometer inserted into thickest part of thigh registers 160°F to 165°F, tenting with foil if browning too quickly, 13/4 to 2 hours. Transfer turkey to platter; let rest 30 to 45 minutes (internal temperature will rise 5 to 10 degrees).

Serve grilled turkey with Mixed- Mushroom and Tarragon Gravy.
Brownie in a Mug

Brownie in a Mug

Ingredients

  • 1/4 cup flour
  • 1/4 cup sugar
  • 2 Tbsp cocoa (natural, unsweetened)
  • Pinch of salt
  • Tiny pinch of cinnamon
  • 1/4 cup water
  • 2 Tbsp canola oil or vegetable oil (NOT extra virgin olive oil, it’s too strongly flavored)
  • 1 to 2 drops vanilla extract
  • 1 small scoop of ice cream or 1 or 2 teaspoons heavy whipping cream to serve

1 Place flour, sugar, cocoa, salt, and cinnamon in a microwave safe ceramic mug. Stir with a fork or spoon to mix well and break up any clumps.

2 Add the oil, water, and vanilla to the cup and stir until the mixture is smooth and there are no lumps.

3 Place in microwave and heat on high until the mixture is cooked through, about a 1 minute and 40 seconds for a 1000 watt microwave. You may have to experiment and adjust the time for less or more powerful microwaves. If you don’t know the power level on your microwave, start with 60 seconds and increase until the brownie is done. It should still be moist when cooked through, not dry.

4 Let cool for a minute and serve with a scoop of vanilla ice cream or a teaspoon or two of whipping cream poured over.


Beer Batter for Fish, Shrimp & Onion Rings

Beer Batter for Fish, Shrimp & Onion Rings

Ingredients Nutrition

Yield 1 1/4 cups Units US

Directions

  1. Mix flour, salt, and baking powder in a bowl using a fork.
  2. Beat beer, egg and oil together in a separate bowl.
  3. Stir into flour mixture until well blended.
  4. Batter should be pretty smooth and moderately thick.
  5. Dip fish, shrimp, or onion slices in coating and deep-fry in hot oil that has been heated to 350 degrees, until it becomes golden.
  6. Drain, and serve while hot and crispy.
  7. This recipe also works well with chicken tenders and vegetable pieces; whatever you like to coat with beer batter.


BBQ Turkey with Mustard Sauce Recipe

BBQ Turkey with Mustard Sauce Recipe

Print Options

Turkey breasts, like chicken breasts, tend to dry out with the long cooking times required for this barbecue recipe. We strongly recommend thighs and legs here. Not only will they be less likely to dry out, the strong flavors will work well with the strong flavors of the barbecue sauce.

Ingredients

  • 4 to 6 turkey legs and/or thighs, trimmed of excess fat
  • Salt
  • Vegetable oil

South Carolina Mustard BBQ Sauce:

  • 4 Tbsp butter
  • 1/2 onion, grated (use a box grater or cheese grater)
  • 1/2 cup cider vinegar
  • 1/2 cup brown sugar
  • 1/2 cup yellow mustard
  • 1 Tbsp dry mustard
  • 1 teaspoon cayenne
  • 1 bay leaf
  • Salt to taste

Method

1 Pat the turkey pieces dry with paper towels. Salt the turkey pieces well all over. Let sit at room temperature for 20-30 minutes.

2 Make the sauce. Sauté the onions in butter until soft (but not browned), about 3-4 minutes on medium heat. Add the other sauce ingredients and simmer slowly, stirring occasionally, for at least 30 minutes.

3 Prepare your grill for high direct heat on one side, and quite low indirect heat on the other side. To do this using a gas grill turn on only half of the burners. If using a charcoal grill, leave one side of your grill free of coals. If using a gas grill, preheat covered for at least 15 minutes.

3 Rub oil all over the turkey pieces. Clean the grill grates with a grill grate scraper. Wipe down the grates with a paper towel soaked in oil.

4 Lay the turkey pieces down on the hot grill, skin side down, to get an initial sear on the turkey. Pay attention because the fat in the turkey may cause flare ups. If this happens be prepared to move the piece to a cooler side of the grill temporarily, or have a spay bottle of water on hand to douse the flames a bit if they get too high. Sear the turkey on the skin side for 3-4 minutes. Once the skin of a piece starts to get browned, move the piece to the cool side of the grill, turning it over so that the skin side is now up. This way the fat under the skin will melt into the meat, basting it, during the next slow-cooking phase.

5 Once you’ve moved all the turkey to the cool side of the grill, cover the grill and let the turkey slow-cook for 20 minutes without looking. Check every 15-20 minutes after that, because everyone’s grill is different. The turkey should cook for at least 1 1/2 hours after the initial sear, probably longer. (I think we cooked these pictured for 2 1/2 hours.) Barbecue by definition must be slow cooking over low heat.

6 After about an hour, start to paint the turkey with the barbecue sauce. Paint only the top part (skin side) to start. Cover and wait another 20 minutes or so. Then flip the turkey over and paint the undersides. Why wait? You want the sauce to sink in, adhere to the turkey and solidify a little; this way it will not drip down into the grill as much. Cover and wait another 15 to 20 minutes.

Depending on how big your turkey pieces are, and your specific grill set up, the time it takes for your turkey pieces to be done will vary. To test for doneness you can insert a meat thermometer into the thickest part of the thigh, not touching the bone. Take the turkey off the grill at 170°F to 175°F for thighs and legs, 165°F for breasts. Or if you don’t have a meat thermometer, cut into one of the pieces with a knife. The juices should run clear. If they run pink, the meat needs to be cooked longer.

You can continue to baste with the sauce every 15 minutes or so until the meat is done.

7 When the meat is just about ready to take off the grill, you can do a final sear on the skin side. Just place the pieces skin side down on the hot part of the grill. Watch it so that it just browns, not burns. It should take 1-2 minutes.

Serve with extra sauce, and plenty of napkins!

Serves 4-8.


Basic Soufflé Recipe

Basic Soufflé Recipe

I have a particular fondness for foods that are (relatively) easy to cook, but appear to most people as difficult and fancy. The soufflé belongs at the head of this category. Everyone seems terrified of soufflés. Fact is: the soufflé can be forgiving and easy to adapt to your needs. Below I’ve provided ingredients for a 2, 3 or 4-egg soufflé. Here’s a perfect rule of thumb: 1 egg per person/serving. If you are cooking for 3 people, make a 3-egg soufflé! I have a pretty nice Krab soufflé recipe in my cooking pages, with more to follow.

Ingredients (2 egg)

  • 2 eggs (white and yolks seperated)
  • 1/2 cups milk
  • 2 tbsp flour
  • 2 tbsp butter
  • 3/4 cup cheese
  • 1/8 tsp creme of tartar (optional)

Ingredients (3 egg)

  • 3 eggs (white and yolks seperated)
  • 3/4 cups milk
  • 3 tbsp flour
  • 3 tbsp butter
  • 1 1/4 cup cheese
  • 1/8 tsp creme of tartar (optional)

Ingredients (4 egg)

  • 4 eggs (white and yolks seperated)
  • 1 cups milk
  • 1/4 cup flour
  • 1/4 cup butter
  • 1 1/2 cup cheese
  • 1/4 tsp creme of tartar (optional)
  • Pre-heat oven to 350°
  • Butter and flour a large baking dish.
  • Prepare your basic roux. (Ie. melt butter in a pan, add flour and cook—whisking constantly—until it just begins to turn a light brown color.)
  • Heat milk (in microwave) until hot, but not boiling.
  • Add a small amount of roux into the milk and mix, then add the milk mixture back into the roux. Surprise! You now have the basic foundation to a simple white-sauce.
  • Reduce heat. Whisk a small amount of this hot sauce mixture into the egg yolks, then add the yolks back into the sauce, whisking well.
  • Warning #1: Once you have mixed in the egg yolk, you must be very carefull to keep the overall mixture at a low temperature! Otherwise the egg yolks will temper and your sause will either have a mottled texture or the consistency of a mysterious plastic petrolium product. Reduce heat to the lowest setting and keep the sause only warm enough to continue melting cheesese or other items.
  • Slowly add cheese and mix until it is melted into the sauce. Surprise! You now have a basic cheese sauce!
  • Warning #2: Before the next step (beating the egg whites) it is worthwhile to note how important it is that you didn’t accidentally get any egg yolk into the whites. SERIOUSLY! A couple drops of the yellow stuff with screw your egg whites badly. If you accidentally get a drop of a broken yolk into the whites, carefully and surgically remove it with a spoon. Consider the egg yolk to be KRYPTONITE at this stage!
  • Now use a mixer at medium or high speed to beat the egg whites with the cream of tartar until they are “stiff but not dry”. (Once they peak, they’re done. If you don’t stop immediately they’ll resemble a merange.)
  • Add 1/4 of the egg white to the sauce and mix.
  • FOLD the sauce into the egg whites. FOLD does not mean mix! This is important: you just barely mix the two together. It is perfectly okay that you see bits of white. The mixture does not need to be homogenous.
  • Place mixture in baking dish and bake for 30-35 minutes.
  • Serve IMMEDIATELY. When souffles cool, they begin to collapse. Don’t worry, it’s perfectly normal. ALL crepes start to fall the moment they are pulled out of the over. If you serve immediately though, nobody will notice.

It is REALLY easy to modify this recipe. All you need for a souffle is some sort of sauce mixed with beaten egg-white. It can be a cheese sauce, chocolate sauce, peanut-butter sauce, fruit sauce, tomato sauce… anything. During the folding phase you can also add solid ingredients like mushrooms, sausage, pieces of fruit, etc. The souffle makes a perfect leftover-casserole.


Banana Cupcakes with Peanut Butter Frosting

Banana Cupcakes with Peanut Butter Frosting


Cupcakes:

  • 1 1/4 cups all purpose flour
  • 1 1/2 teaspoons baking powder
  • 1/2 teaspoon baking soda
  • 1/4 teaspoon salt
  • 2 very ripe large bananas, peeled
  • 1/2 cup sour cream
  • 1 1/2 teaspoons vanilla extract
  • 3/4 cup sugar
  • 1/2 cup (1 stick) unsalted butter, room temperature
  • 1 large egg
  • 1 large egg yolk

Frosting:

  • 1 1/2 cups powdered sugar
  • 1 8-ounce package cream cheese, room temperature
  • 1/2 cup (1 stick) unsalted butter, room temperature
  • 1/2 cup smooth peanut butter (do not use old-fashioned or freshly ground)
  • Chopped lightly salted roasted peanuts (optional)


For cupcakes:
Position rack in center of oven and preheat to 350°F. Line 12 standard (1/3-cup) muffin cups with paper liners. Whisk flour, baking powder, baking soda, and salt in medium bowl to blend. Mash bananas with fork in another medium bowl until smooth. Mix sour cream and vanilla into bananas.

Using electric mixer, beat sugar and butter in large bowl until light and fluffy, about 3 minutes. Add egg and egg yolk and beat until well blended. Add flour mixture in 3 additions alternately with banana-sour cream mixture in 2 additions, beginning and ending with flour mixture and beating just until blended after each addition. Divide batter among prepared muffin cups (generous 1/4 cup for each).

Bake cupcakes until tester inserted into center of each comes out clean, about 20 minutes. Transfer cupcakes to rack and let cool completely.

For frosting:
Sift powdered sugar into large bowl. Add cream cheese, butter, and peanut butter. Using electric mixer, beat mixture until smooth. Spread frosting over top of cupcakes, dividing equally. Sprinkle lightly with chopped peanuts, if desired. DO AHEAD: Can be made 1 day ahead. Store airtight at room temperature.


Baked Ziti Recipe

Baked Ziti Recipe

If you don’t have Italian seasoning in the pantry, use 1 teaspoon dried oregano, 1 teaspoon dried basil and 1/2 teaspoon dried thyme.

Ingredients

  • 1 pound ziti (can sub penne) pasta
  • Olive oil
  • 1 pound bulk Italian sausage or ground beef or pork
  • 1 large onion, chopped
  • 3-4 garlic cloves, chopped
  • 1 Tbsp fresh rosemary (or basil), minced
  • 1 Tbsp Italian seasoning
  • 1/2 teaspoon red pepper flakes
  • 1 large jar of marinara sauce (about 32 ounces) or make your own tomato sauce
  • 1/2 pound of mozzarella cheese, grated
  • 1 heaping cup of ricotta cheese
  • 1 cup grated parmesan or pecorino cheese

Method

1 Bring a large pot of water to a strong boil. Add about a tablespoon of salt for every 2 quarts of water. Add the pasta and boil, uncovered, until the pasta is al dente—edible but still a little firm. Drain the pasta through a colander. Toss with a little olive oil so the pasta does not stick together while you make the sauce.

2 Pour a tablespoon or so of olive oil into a large sauté pan on medium-high to heat. When the oil is hot, add the bulk sausage or ground meat. Do not crowd the pan (work in batches if needed). Break up any large chunks of sausage as it cooks. Brown well. Don’t stir that often or it will be more difficult for the meat to brown. If you are using ground beef or pork instead of sausage, add a little salt.

3 When the meat is mostly browned, add the onions and stir well to combine. Sauté everything until the onions are translucent and beginning to brown, about 4-5 minutes. Add the garlic, rosemary or basil, Italian seasoning and red pepper flakes and stir to combine. Cook 1 minute, then add the tomato sauce and stir well. Bring to a simmer.

4 Preheat the oven to 350°F. Spread a thin layer of sauce in the bottom of a 9×13-inch casserole pan, then dot the surface with half the ricotta cheese. Ladle in some sauce with the pasta, mix it well and add the pasta into the casserole.

5 Pour the rest of the sauce over the pasta, dot the remaining ricotta cheese over the pasta, and sprinkle on top both the mozzarella and the Parmesan cheese. Bake in the oven until the top is nicely browned, about 20 minutes.